EZGO RXV 48 Volt Battery Wiring Diagram: An Easy Written Solution For You
The EZGO RXV is one of the finest golf carts on the market. This electric battery-powered tiny beast meets all the needs and has made a place of its own.
But it does come with a hassle when changing the batteries and you will need a diagram for that. Here comes a question, what is a diagram? Well, it’s a map of installing the batteries. Simple.
Though going with a diagram may seem an easy approach, we have something easier for you. In this article, we will tell you the exact process of wiring the battery. It’s like a written EZGO RXV 48-volt battery wiring diagram (yes, its battery requirement is 48 volts). Sounds good? Let’s dive in.
An Overview of The EZGO RXV 48-Volt battery Wiring Diagram
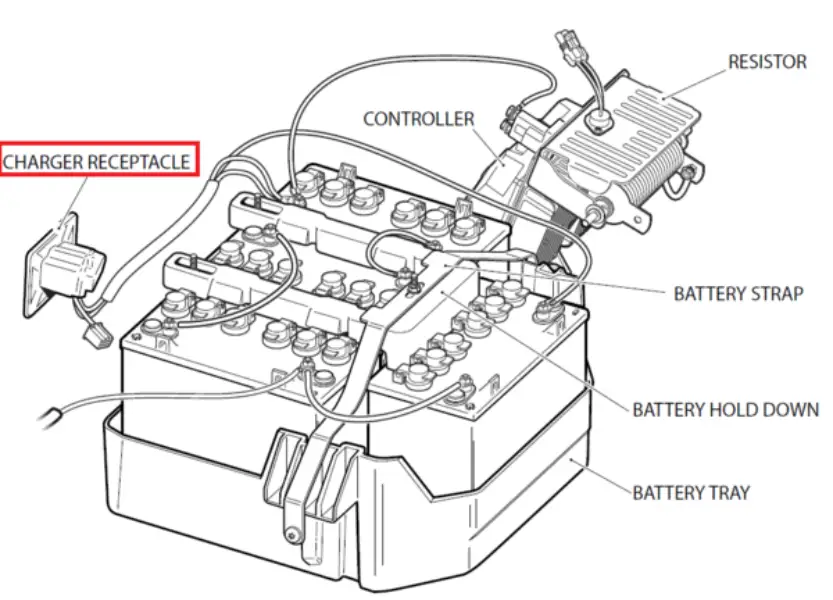
Simply, a battery wiring diagram is a blueprint or a road map for wiring a battery on a golf cart. So, an EZGO 48-volt battery wiring diagram is the same thing as it shows you the entire process of wiring a 48-volt battery inside this cart.
It’s basically an image where every single procedure is present. You may get this as a soft or hard copy. But the whole purpose of this thing is to show you what to do.
For a lot of people, a battery wiring diagram is a pretty useful thing as they may not have prior knowledge or experience to wire a battery. But for some, even having a diagram isn’t enough.
So, for that reason, we will be discussing the whole thing in detail here. Yes, the diagram shown above seems pretty easy to go with. But having a detailed written alternative is surely not a bad move, isn’t it?
Things You Will Need To Wire A Battery On EZGO RXV
So, let’s get to know about the things that you will need to get the battery wiring done on your EZGO RXV one by one.
Protective Gloves And Glasses
Before getting to start the main wiring thing, get yourself a pair of protective gloves and protective glass.
Gloves will protect you from battery acid and glass will help you in almost any case. You may think that getting these things isn’t that necessary, but hey, safety matters.
Dielectric Grease
This liquid will be needed when you are done pulling out the old package of batteries from your EZGO RXV.
After bringing out the batteries, you will have to use this to clean up the battery compartment.
Open or Socket Wrench With Extra Sockets
The next must-have tool is a socket wrench. With this, you will be opening the sockets that connect the wires to the batteries.
You may need to have some extra sockets but that’s not mandatory. But keep an extra pair or two to play safe.
Battery Wires
Well, getting battery wires isn’t primarily mandatory but you will be in need of those if the existing wires of your EZGO RXV are not in working condition.
Battery Straps
And last but not the least, battery straps. This is one of the most basic-looking yet necessary tools.
Because pulling out a battery from the cart isn’t an easy job and doing that with your hands is tough as you may face issues balancing the battery. In this regard, this little bad boy comes and makes the job easier.
How To Wire A Battery On EZGO RXV?
So now we are up for the big game as we will be discussing the entire procedure of wiring a battery on the EZGO RXV. Let’s dive in without taking any more time because there is a lot of work out there.
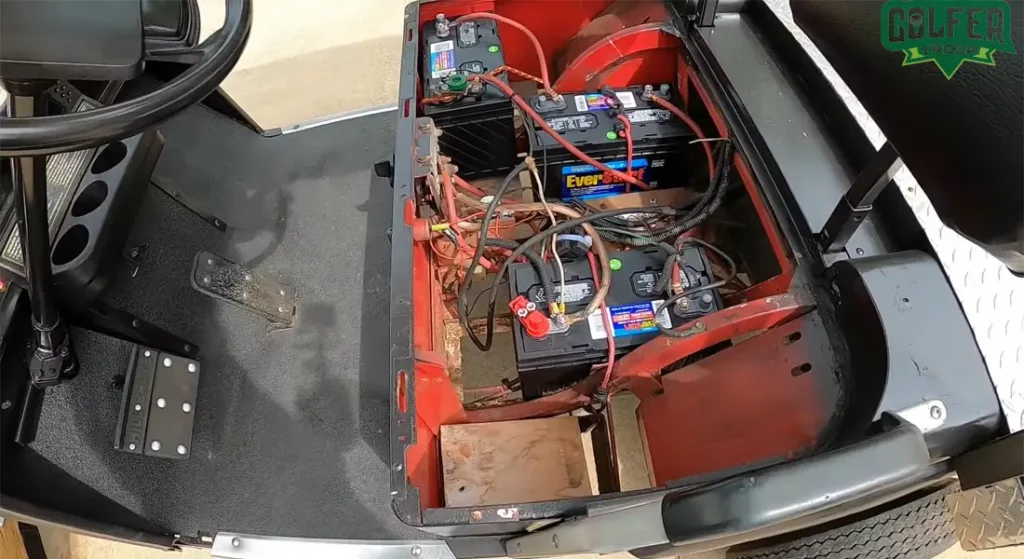
Step 1: Open The Seat Pan And Take A Photo
Well, you may find the heading a bit weird but the truth is yes, you do need to take a photo of the existing battery system.
Because, after installing a new set of batteries, you will have to go with the exact same wiring system that is already in there.
If you don’t follow the existing wiring system, you won’t get the result or the wiring won’t be done right, In fact, you may come across electrical hazards.
You can also draw it out on paper if you don’t prefer taking a picture. Just see the picture of the diagram that we have put in the overview section of this write-up to be more clear about what we are talking about.
This whole photo-taking thing or making a sketch by yourself will let you identify the positive and negative ports, the orientation of the wires, and other important things.
Step 2: Turning Things Off
The next step is to check if the vehicle is off or not. Also, don’t forget to see if the vehicle is plugged in for charging or not.
If the vehicle is on or is plugged in for charging then immediately turn the operation off because you can’t change the batteries while your EZGO RXV is running or getting charged as it will be very much risky and may create unwanted incidents.
Step 3: Disconnect The Wires
Now, disconnect all the wires. You will be easily able to identify the positive and negative wires as one of their parts will be connected to the positive or negative terminals and the other parts won’t be connected to any other battery.
Use the socket wrench to open the sockets. Be a bit careful so that you don’t end up losing any sockets.
Step 4: Check The Conditions Of The Wires
You may need to replace the existing wires if they are not in working condition. As you have already disconnected them, see if they can be used any further or not.
Just bend or press them a bit and try to hear if any cracking sound comes from them. If you find the wires in an unstable state and don’t think they should be kept, replace them with new ones.
Step 5: Pulling Out The Batteries
So, it’s time to bring out the batteries from the cart. Just get the battery strap, hook it up with the battery and simply pull it out. Do the exact same thing for all the other batteries.
Step 6: Cleaning The Battery Compartment
Now, get the dielectric grease and spray it out inside the battery compartment to clean it up. After spraying, Wipe the entire thing with a good-quality cloth.
Make sure to place a paper or cardboard or something like that so that if any acid drops it won’t harm your floor.
Step 7: Installing The New Set Of Batteries
We are done with most of the things. Now it’s time to place the new set of batteries inside the battery compartment of your EZGO RXV.
Take the battery strap and hook it up with the new set of batteries just the way you did when pulling out the old ones.
After hooking up the strap, lift up the batteries and place them in the compartment one by one.
No need to hurry here. Be careful when you place the batteries to avoid complications.
Step 8: Connecting The Wires
Here comes the most vital part. Now you will have to connect the wires and that has to be done very carefully.
Go back to the photo that you took or the sketch or diagram that you made and connect the wires according to that.
Don’t forget to wire the positive wires with the positive terminal and the negative ones with the negative terminal. Be careful while you do that and make sure you don’t mess things up.
Connecting the wrong wires or configuring the whole thing in the wrong manner may lead to destructive incidents. So reexamine the wiring after you’re done.
Step 9: Check The Vehicle
This is the last part of the whole battery wiring thing. We are actually done with wiring the batteries. Now we just need to check whether or not everything is working properly or not.
First, plug the vehicle for charging. See if it charges or not. Also, you can start the EZGO RXV and see the overall condition. That’s it.
Common EZGO RXV Battery Wiring Problems And Their Solutions
As we are done with our whole battery wiring thing, let’s get to know about some of the common problems that people face and their possible measures.
The EZGO RXV Doesn’t Start
You have done everything right but the cart doesn’t start. In this regard, open the seat pan and twist the battery connectors a little bit.
If after doing that the carts start then there’s a high chance that the terminals got corroded and you should reach out to an expert or technician to fix this problem.
The Wires
If the existing wires got worn out or are not in working condition, you will face some issues with your EZGO RXV.
That’s why, while placing a new set of batteries, it’s a must to check the condition of the wires that are already in.
If they are good, you won’t face any problems. But if they aren’t in good condition, you must replace them with new ones.
Not Taking A Photo Of The Battery Wiring Configuration
This isn’t a problem, rather it’s a mistake (And yes, it’s obvious that we humans will make mistakes). Look, taking a picture of the battery cart before placing new batteries in it is a must.
Because we have already told you this before and we will say it again. If you do not wire the new set of batteries the exact same way the wires were previously connected, your cart won’t work.
So, if you end up forgetting to take a picture or draw a diagram, you will be facing unwanted problems.
FAQs.
We have covered almost every aspect. So, let’s answer some of your most frequently asked questions.
Is it necessary to change the battery wires of the EZGO RXV?
Changing the battery wires of the EZGO RXV is mandatory but it’s highly recommended. The thing is, change the wires if they can’t be used any further. If they can be used, no need to change.
Why my EZGO RXV doesn’t start?
There are quite a few reasons behind this. If the battery terminals are damaged or anything is wrong with the ignition, it won’t start. It also won’t start if the EZGO RXV isn’t in the parking transmission position.
Call a technician for the terminals and ignition problem and transmit the vehicle to the parking position for the transmission problem.
Do I need to leave my EZGO RXV on charge all the time?
No, you don’t have to do that. Just plug it in when you need to charge the batteries and when it’s full, unplug everything.
Can I use 4 12-volt batteries on the EZGO RXV?
Yes, you can use 4 12-volt batteries in the EZGO RXV as its required voltage is 48. But it can be done if the space of the battery compartment allows it. However, usually, 6 8-volt batteries are used.
Conclusion
Well, honestly, the battery wiring of the EZGO RXV isn’t as complex as it seems. Yes, diagrams aren’t that visually pleasing and for a lot of people, it’s not a clear source of information.
But if you pay a little attention, you will be able to handle the whole wiring thing gradually. On the other hand, if you don’t have a diagram, you won’t have to worry. Because eventually, you will have to follow the existing battery wiring configuration of the EZGO RXV.
At the end of the day, battery wiring isn’t that complex. Just be patient while you do the job. You can also reach out to people who have prior experience in doing this before making any move.
- Read Also: How to Fix EZGo Golf Cart Won’t Move Problem? (Understanding and Resolving)
- Read Also: EZGo Golf Cart Won’t Go Forward or Reverse: 6 Easy Solutions
- Read Also: Ultimate Guide On EZGO TXT Governor Adjustment
- Read Also: Everything About EZGo Gas Golf Cart Battery
- Read Also: EZGo Express S4 Upgrades | Increase Your Golf Cart’s Performance
Meet Jalal, a passionate golf writer and the driving force behind Golfertroop.com, your go-to destination for all things golfing! Whether you’re a seasoned golfing veteran or a beginner taking your first swing, Jalal is here to assist you in making the most out of your golfing experience.


![EZ Go Golf Cart Fuse Box Location [Fix a Blown Fuse]](https://www.golfertroop.com/wp-content/uploads/2023/09/EZ-Go-Golf-Cart-Fuse-Box-Location-768x419.png)
![7 Most Common Club Car Subaru Engine Problems [Easy Solution]](https://www.golfertroop.com/wp-content/uploads/2022/08/Club-Car-Subaru-Engine-Problems-768x419.webp)