Golf Simulator Wall Padding–Everything You Need To Know!
Golf simulators have become quite popular for practicing golf swings at home comfortably. But, when you hit the golf ball, it carries a lot of energy and can cause significant damage to whatever it hits.
That’s why you need proper protection for the Golf Simulator, and Wall Padding is a great way to do so. Golf Simulator Wall padding usually means coating your wall with energy-absorbing material like foam. So that wild balls can’t damage anything.
However, is it really necessary? Or what type of Wall Padding is suitable for you? Follow this article to know the answers.
What Is Golf Simulator Wall Padding?
Golf simulator wall padding is a protective layer to safeguard walls and people from potential damage caused by golf balls during practice swings.
Usually, an average golfer can launch a Golf ball at between 100 and 150 mph, and for longest hitters, the speed can be up to 200mph. And any golf ball has around 45g weight.
So, any stray golf ball can dent a wall plaster or crush your kid’s skull if you didn’t build the simulator setup with safety. And the damage from a flying ball can be many times more serious than denting a ceiling.
That is why proper Wall Padding is a must. It serves as a cushioning barrier, minimizing the impact of golf balls and preventing harm.
In indoor golf simulator setups, you should cover the entire wall, from floor to ceiling, as well as the complete ceiling, with wall padding for comprehensive protection.
Advantage Of Golf Simulator Wall Padding
Not only does the golf simulator wall padding protect your wall from harm’s way, but it also has other benefits. Such as:
- Safety: Wall padding reduces the risk of injury if the ball is shacked or bounces off the screen. If you have children or other people around you while using the simulator, having Wall padding is a must.
- Protection Against Wall Damage: Wall padding prevents damage from stray, shanked, and skyed golf balls. So you can swing the ball at your heart’s consent.
- Sound reduction: Wall Padding absorbs most sounds in your golf simulator. So you can practice your shorts without any issues.
- Aesthetics: Wall Padding is also a great way to increase your wall’s looks and aesthetics.
- Bounce-back reduction: When your ball hits your home’s wall, it bounces back with full force. But using the wall pads reduces the wall back force, so you can easily grab the ball.
That’s why you should always spend some money on wall pads in your golf simulator.
Type of Wall Padding For Golf Simulator
Usually, you can use any wall pad in your Golf Simulator, but not every material will fulfill your golf needs. That’s why I’ve listed some wall pads that are mainly suitable for indoor golfing.
- Foam Panels: Foam panels can be an excellent choice for Wall Padding if you are low on budget and making a DIY Golf Simulator. It can effectively absorb sound and provide additional padding/cushioning to your walls. But just foam covers can’t sustain all of your golf ball hits. So, if you want more durability, cover those with leather.
- Wood Back with Z-Clip Attachment: AK Athletics manufactures up to 8-foot tall wall pads. The recommended style for golf simulators is the wood back with a z-clip attachment. The standard custom wall safety panel has a 1-inch lip, making it easy to screw into the wall.
- Acoustic Wall Tiles: The tiles reduce the bounce back of your golf ball, making your golf simulator experience more enjoyable.
- Carpet Tiles: Opt for thick pile carpet tiles to significantly reduce bounceback during indoor golf sessions.
- Gym Floor Tiles: You can also use thick padded gym floor tiles instead of skinny mats for better impact absorption during your swings.
- Curtains: If you want a cheap alternative to enhance your golf simulator setup, thick black curtains are a good choice.
- Vant Panels: Typically, these panels are designed for headboards, but you can also use them on your golf simulator.
There are also other alternatives, such as Acoustic Foam Panels, AK Athletic Gym Wall pads, etc. But you should read some user reviews before buying them.
DIY Vs. Professional Installation: Which One Should You Use For Golf Simulator Wall Padding? (self)
Well, the do-it-yourself solutions and a professional installation have merits and difficulties. But ultimately, the choice depends on your personal preference and skill level.
Here’s a direct comparison between these two methods:
| Criteria | DIY Installation | Professional Installation/ Prebuild Setup |
| Cost | Generally more budget-friendly as you handle the process yourself. | Usually, you have to pay more for professional Services. |
| Flexibility | You can customize the process and design as you see fit. | Professionals may have set processes, and you will get less flexibility in design. |
| Learning Opportunity | You may gain new skills and hands-on experience. | No direct learning |
| Efficiency | May take longer, especially if you are new to DIY projects. | Takes Less time. |
| Clarity | If it’s your first time, the installation may not be as neat or clean. | Professionals ensure precise measurements and alignment for your wall tiles. |
| Uniqueness | As you are making the design yourself, it will be unique. | Pros will charge extra for making the design unique. |
So, if you are up for groundwork and want to learn something new, DIY Installation is good for you. Otherwise, go for the Professional alternative.
How To Install Wall Padding for Golf Simulator?
If you are new to wall padding installation but want to install them yourself, you are in the right place. Here, I’ve compiled an easy step-by-step guide for Wall Pad installation. Just follow this process:
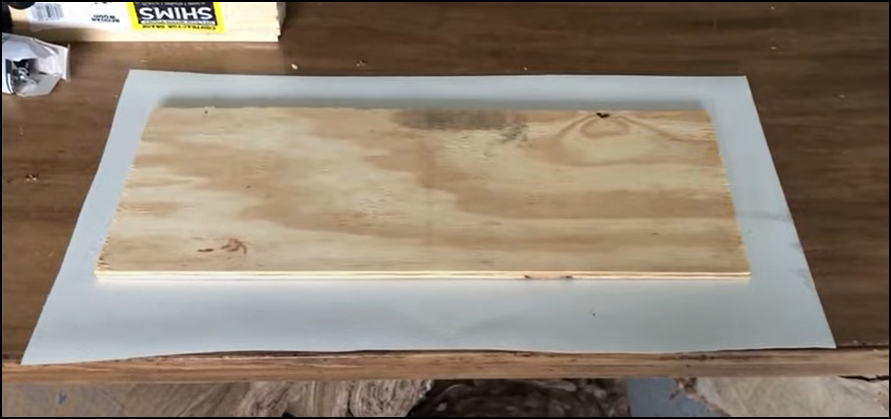
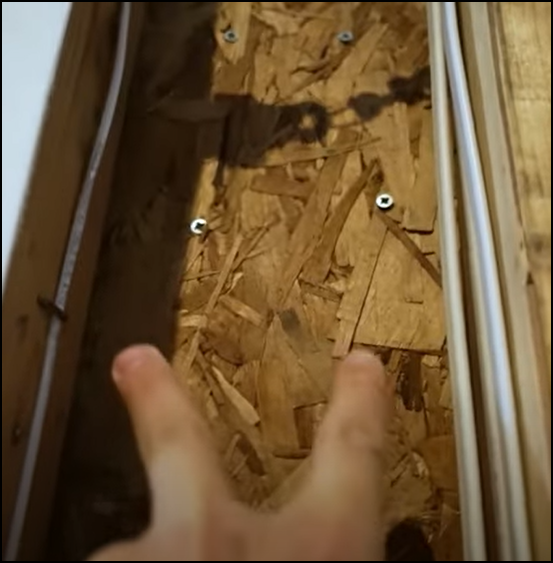
1. Measurement and plywood selection:
First, measure the wall and select the number of tiles. Then select the type of wood, but for the best value, you can use 3/8 plywood from Lowe’s.
However, don’t ask for 24-inch parts because, with the blade width, it’ll make your last two end up being a little shorter than the rest. Just ask them to cut it to 23 and three-quarters.
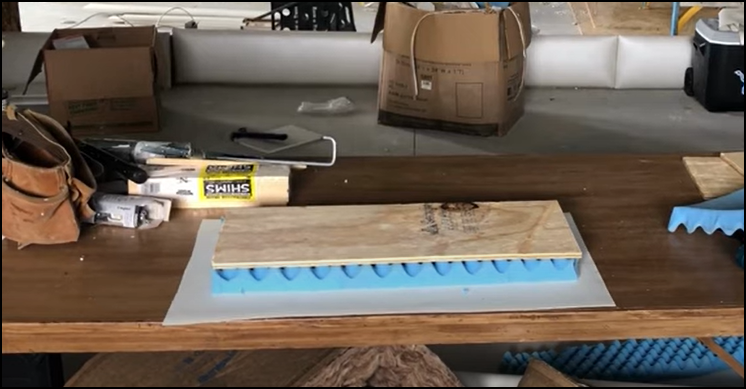
2. Leather and Foam selection
After selecting the wood, choose the foam and the leather coating for your wall tiles. Marine Vinyl Leather provides very good quality for the money you spend.
And for the foam, you should go for the two-inch thick egg crate foam because it was like a quarter the cost of any other foam.
3. Making Wall Pad
To make the tiles for your golf simulator wall padding:
- Cut the leather in 1.5X of the plywood (because you have to wrap the wood with the leather) and cut the foam in the same as the wood area.
- Place the cut foam over the plywood, and cover it with the leather. You must ensure the flat side faces the leather while covering.
- Staple every edge to hold the material and foam securely using a Staple Gun.
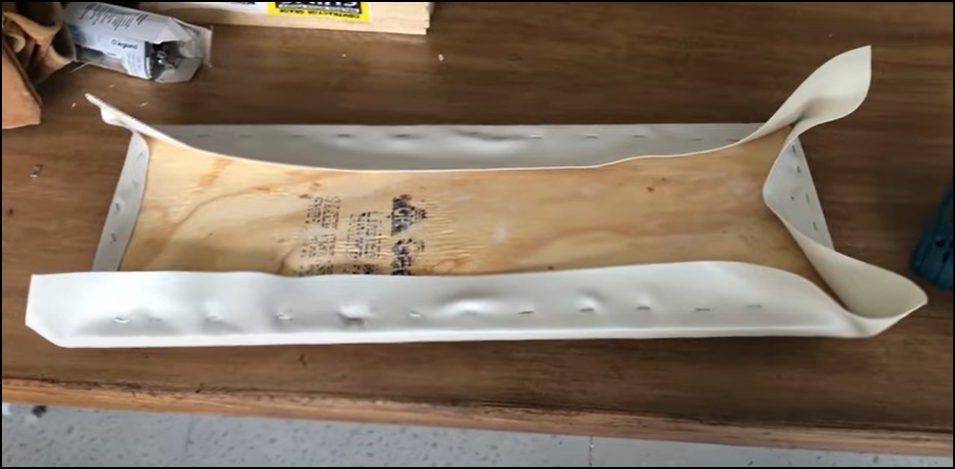
- Tuck the egg crate foam carefully to minimize any ripples.
- Use screws to mount those plywood blocks, so they won’t penetrate the leather.
- Check for any noticeable gaps or misalignment.
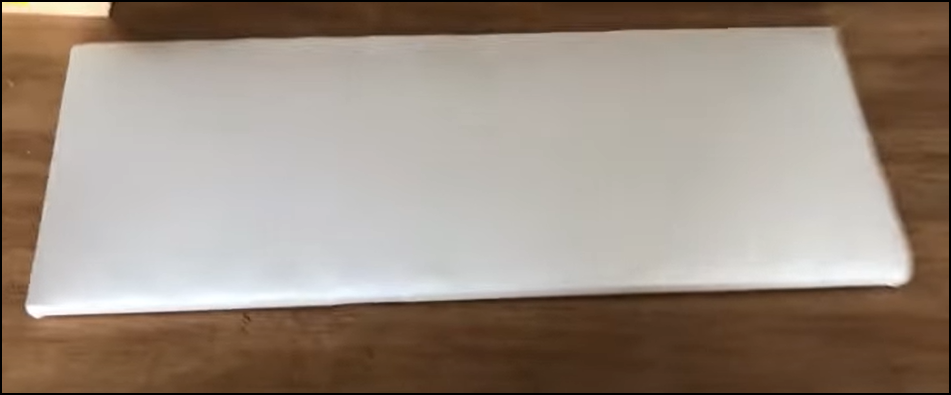
And you are good to go.
FAQs
People building a golf simulator in their house for the first time usually have many questions in their mind. I’ve collected some of those with derelict answers to ease their quarry.
How Much Space Do You Need Behind A Golf Simulator Screen?
For your golf simulator setup, you should have a room that is at least 13 feet deep, including the space behind the tees.
Will A Foam Wall Pad Stop A Golf Ball?
Yes, the foam will stop a golf ball. Also, it will observe most of the impact force so the ball won’t bounce back. But if you use just foams without any lather, the ball will make holes in those foams.
Does A Golf Simulator Room Need To Be Dark?
Yes, you should make the room as dark as possible. Excessive light can wash out the projected image on your screen, making it less clear and crisp.
Conclusion
And there you have it. After reading this article, I’m sure you have a clearer idea about the golf simulator wall padding.
But if you are going for a DIY installation for wall padding, you should read the product description and reviews thoroughly before selecting any product.
Happy Gaming!
Meet Jalal, a passionate golf writer and the driving force behind Golfertroop.com, your go-to destination for all things golfing! Whether you’re a seasoned golfing veteran or a beginner taking your first swing, Jalal is here to assist you in making the most out of your golfing experience.


![How Do You Remove the EZGo Driven Clutch? [7 Easy Steps]](https://www.golfertroop.com/wp-content/uploads/2023/03/How-Do-You-Remove-the-768x419.png)