How to Remove Tee Marks From Golf Driver? (6 Easy Steps)
Modern drivers are manufactured with the latest technology by brands. If you want to have the full potential of them, taking care of your driver is essential. Proper maintenance and cleaning are also the keys to longevity.
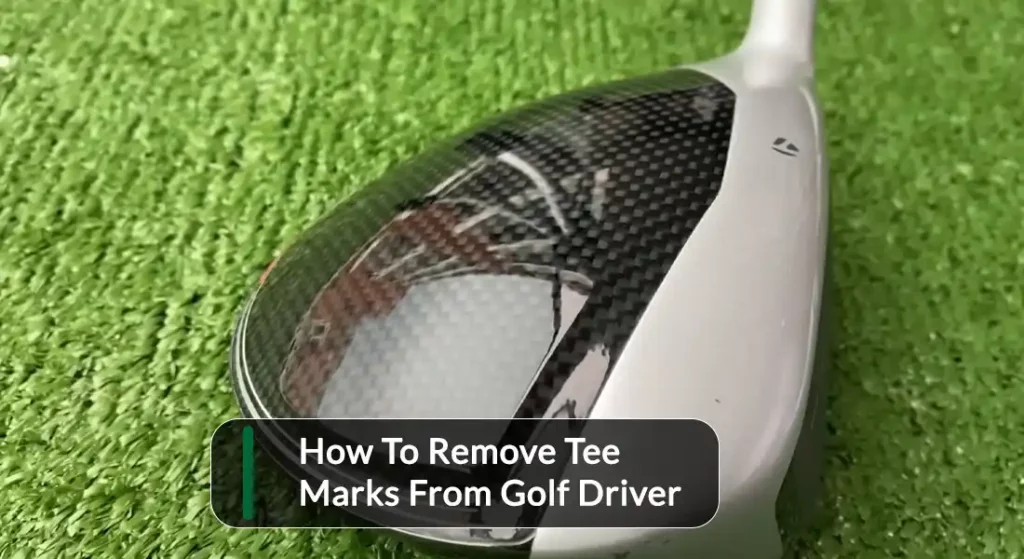
Golfers need to ensure that no mud and grass cling to their drivers after each game. Along with these common grimes, tee marks are another nuisance that makes your driver ugly. Who does like a tee mark on a shiny driver surface?
In this post, we are going to share how you can remove tee marks from your golf driver. Let’s explore.
Why Does My Driver Have Tee Marks?
Tee marks on your golf driver are nothing but the slack paint that has come off from tees. Most of the tees are covered with artificial paints. The paint is usually inexpensive and transient.
Golfers put the ball on the tee to hit it harder for a long flight. The paint of the tee easily comes off due to heavy impact when a golfer swings with full force.
Tees with white paints cause the tee marks most because the white color is easily visible. By checking out the tee mark on the driver’s surface, you can instantly understand where you have just hit.
Some golfers like tee marks during the game because they can identify if they hit the ball right. However, it still looks dirty and you should remove the mark after the game.
Are Tee Marks On the Driver Bad?
Tee marks are not bad at all unless you see some deep scratch on the driver’s surface. The mark is nothing more than a spot of tee paint that has come off due to hard-hitting.
Though it looks odd, some golfers like to have the tee marks on their driver to show off their hard-hitting and accuracy.
Can You Avoid Tee Marks On Driver?
You can rarely avoid the tee mark during the game. Almost every golfer on the planet experiences it after a full swing.
However, there is a tricky solution to avoid tee marks. Golf tees are commonly made of four types of components. They are wood, bamboo, rubber, and plastic.
Wood and bamboo tees cause the marks most due to their fragile surface and slack painting. On the other side, rubber and plastic tees cause a very little tee mark.
You can pick rubber and plastic-made tees to avoid deep tee marks. Moreover, using black and brown colored tees will add extra advantages.
How to Remove Tee Marks From a Driver?
The driver is the largest and the heaviest club in your golf set. So, cleaning the tee marks from it is essential as a part of regular maintenance.
The first thing to detect during the cleaning process is the type of driver. Both metal and wood-made drivers are available. Besides, each type has a different cleaning process to remove the tee mark.
We are going to describe how to remove tee marks step by step.
Things you will need:
- A bowl or a bucket
- 2 sided club cleaning brush
- A cloth (for wooden drivers)
- Warm water
- Dishwashing liquid or hand soap
- A towel
Note: Club cleaning brush is a double-edged brush particularly designed to remove dirt from the golf clubs. The brush has a soft bristle on one side and a brass bristle on the other side. However, you can also use an old toothbrush that is similar to this item.
Removing tee marks from metal driver
Follow these steps to clean off the tee marks from your metal golf drivers.
Step 1: Take a bowl or a bucket and pour some warm water and soap into it.
Step 2: Mix the water and soap well until you see bubbles.
Step 3: Immerse the brush into the mixture. Be careful so that the brush doesn’t get too damp.
Step 4: Hold your driver’s surface upward and scrub the surface gently.
Step 5: If you still notice the tee mark after a few attempts, use the brass bristle side and scrub the surface carefully.
Step 6: When the mark becomes invisible, dry the surface off using a towel.
Caution: Brass bristle brush can seriously scratch the paint of your golf driver. It is designed to scrub the metallic surface only. You need to be careful so that it doesn’t reach the painted area.
Removing tee marks from wooden driver
Cleaning tee marks off from wooden drivers are fairly different than the previous one. Check out this step-by-step process to follow.
Step 1: Dip a clean soft cloth into a bowl or bucket of warm water.
Step 2: Keep the cloth submerged till it gets damp well.
Step 3: Take it up after a few whiles and squeeze the cloth lightly so that excess water drips.
Step 4: Hold the wooden surface upward and sponge the driver’s surface gently.
Step 5: When the mark appears no more, make sure to dry the driver pretty well using a towel.
Caution: Using soapy water or scrubbing the wooden surface with a brush is not recommended. Either it is a metal driver or a wooden driver; never submerge the golf driver in water.
If you have never tried anything to remove tee marks from your drivers, try these steps. After you remove the tee marks successfully, make sure you have properly dried the driver’s head and keep them in a bag.
- Read Also: Golf Push Cart with Baby Seat: A Must-Have for Parents!
- Read Also: Golfing with Baby: A Guide to Safety on the Course
- Read Also: Benefits of a Baby Stroller Golf Bag | Tee Time with Baby
- Read Also: How to Choose the Right Strap for a Titleist Bag? (5 Facts)
- Read Also: How to Put Straps on Titleist Bag? (Single and Double Both)
- Read Also: How to Measure Driver Shaft Length with and Without Head?

I am Kawsar, professional blogger love to learn new things and try to solve different problems faced by user based on my research.
Golfertroop is my blog on free golfing resources and guide for beginners. Here we provide well-researched information about golf based on your query.


![Westchester Country Club Membership Fee [3 Things to Follow]](https://www.golfertroop.com/wp-content/uploads/2023/08/Westchester-Country-Club-Membership-Fee-768x419.png)