Why Club Car Charger Not Working: Understanding & Resolving
Club car is a credible name in the electric golf cart market. Since the start, it has made a place for itself. As this little beast has batteries in it you will have to keep them changing when needed. But oftentimes you may end up facing problems with its charger not working.
Well, checking the battery voltage and connections, replacing the fuse or the circuit board, etc. will eventually lead you to solve this problem. The thing is, from the surface level this problem may seem complex but in reality, it isn’t.
For that reason, here, we will be talking about some of the easiest solutions to the problem of the club car charger not working. So, without waiting any longer, let’s keep going.
Why The Club Car Charger Is Not Working?
There can be quite a few reasons behind a club car charger not working. But oftentimes, it seems that the charger isn’t working but actually it is working. Yes, you read that right. The symptoms can be unintentionally deceiving.
But that doesn’t mean that there isn’t any reason behind the club car charger not working and the charger is forever okay. Some of the basic reasons behind a club car charger not working are-
- Battery voltage issues
- Connection and other problems
- Diode, fuse, or circuit board issues
Now let’s learn about these club car charger problems and their measures one after the other.
5 Easy Fix For Club Car Charger Not Working Problem:
We have stated 3 basic reasons behind the club car charger not working issue. Now let’s get to know about the solutions that you can go with to get rid of this problem.
1. Check The State Of Your Battery
We have already mentioned that there are times when you will think that the charger is not at all working but in reality it is in a stable state.
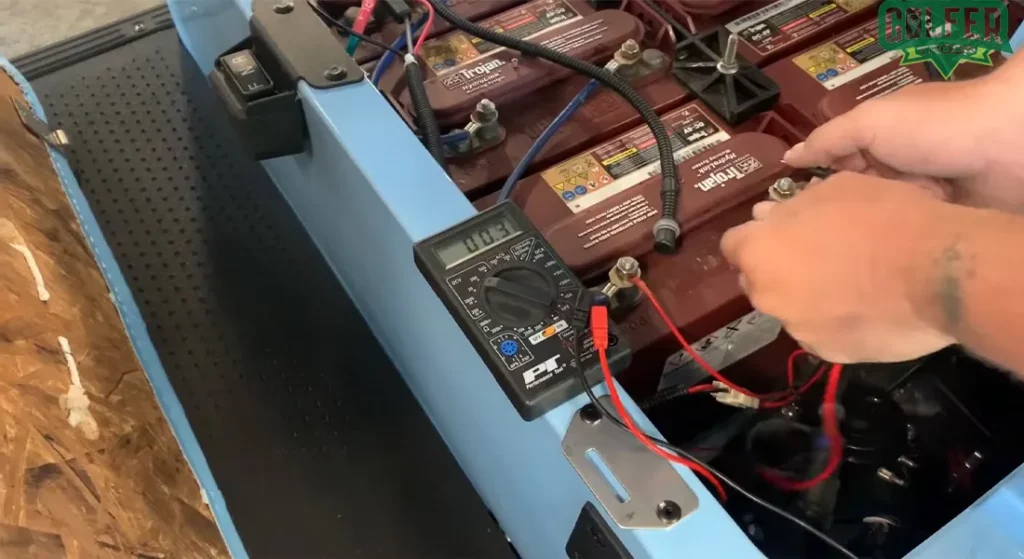
A golf cart battery needs at least 25-30 volts in it to be detected by the charger. If the battery voltage is below 25-30, the charger won’t be able to detect that and won’t start working.
So, get yourself a voltmeter and touch the positive terminal of the battery with its red positive lead and the negative terminal with its black negative lead. If the voltage of the battery is below 25-30, charge the batteries manually.
To manually charge a battery, use a car charger. First of all, bring out the batteries and hook them up with a car charger (one battery at a time) and leave them on charge for at least 20-30 minutes.
Doing this, the battery voltage will rise to 25-30 and you can then place the batteries back in their place and charge them with your golf cart charger.
However, if you find that the battery voltage is within 25-30 then this indicates that there are some other issues with the charger. In this case, you may need to replace it. But before making a purchase, consult with an expert.
But before making any sort of fixing move, unplugging the charger from the cart and the wall outlet is a must.
If you don’t do that, you may end up facing destructive outcomes which you surely don’t want to experience, do you?
2. Checking The Connections, Cleaning The Mess, And Others
The next job is to examine the battery connections. Look closely if the battery connections are tight enough or not.
If the connections are loose, tighten them. Also, see if the connections are dirty or if the wires got frayed or not.
If the connections are dirty, then you must clean the terminal otherwise due to the dirt the connection will get loose making the battery not work properly. As a result, the charger won’t be able to detect the battery and won’t function.
To clean the terminals, first, disconnect the wires. Then mix water and soda to make a paste out of them. Make sure that the water and soda are of the same amount.
Apply the paste with a brush on the unclean terminals and other areas if needed and wipe them after a few minutes with a dry piece of cloth. When you’re done cleaning up the mess, reconnect the wires.
If dirt is not the problem, see if the wires got frayed or not. In the case of frayed wires, you don’t have any other option other than replacing them.
3. Examine The Fuse
If every other thing is okay, go with checking the fuse. To check the condition of the fuse, open the charger cover, get yourself a multimeter and place it on the screw that is beside the fuse.
Now, touch the side of the fuse with the red-colored lead of the multimeter. After doing that if you hear a beep sound then it indicates that the fuse is working.
On the other hand, if it doesn’t make a sound, it isn’t working and you will have to go with a replacement.
4. Check The Diodes
If the fuse is okay, see if the diode is in working condition or not. To examine the diode, first, open the cover of the charger with a screwdriver. After that, disconnect the wires that connect the diodes to the transformer.
Now take a multimeter and connect one of its probes to the part of the diode that is on the plate and the other probe to where the transformer wire was located.
When you’re done, write down the readings. Then, exchange the position of the probes and write down the readings again.
If you don’t get any readings or positive readings from both diodes, the diodes are faulty and have to be replaced.
On the other hand, if you get positive readings from only one of the diodes, that indicates the diodes are working fine.
5. Check The Circuit Board
If the battery is okay and the connections are fine and the fuse and diodes are also working, then maybe there is something wrong with the circuit board and you will have to examine that.
In the first place, open the cover of the charger. You will get to see the circuit board. See if there is any visible damage or not. If you find any sort of visible damage, you must change the circuit board with a new one.
Conclusion
The club car charger not working is a pretty basic issue. Though from the outlook you may find it very convincing that it may have stopped working but in most cases, it’s not what you think it is.
That’s why, before making any sort of move, just look at the basics to identify the problems. In most cases, you will get to identify the problems and eventually fix them. Just be a bit patient and go slow.
But yes, there will be times when you won’t be able to detect the problem let alone fix it and you will have to reach out to an expert for that. So, be prepared for situations like that as well. But in the first place, examine it by yourself.
- Read Also: Club Car Governor Adjustment: A Step-by-Step Guide for DIY
- Read Also: Club Car Golf Cart Oil Type: Compatible Engine Oil
- Read Also: Club Car Battery Light Codes: Meaning and Troubleshooting
- Read Also: Ultimate Guide On Club Car Speed Sensor Bypass
- Read Also: Why Club Car Solenoid Not Clicking? [6 Reasons & Solutions]
- Read Also: Club Car Drive Clutch Removal Process [4 Easy Steps]
Meet Jalal, a passionate golf writer and the driving force behind Golfertroop.com, your go-to destination for all things golfing! Whether you’re a seasoned golfing veteran or a beginner taking your first swing, Jalal is here to assist you in making the most out of your golfing experience.
![How to Fix Club Car Eric Charger Problems? [Easy Solution]](https://www.golfertroop.com/wp-content/uploads/2022/08/How-to-Fix-Club-Car-Eric-Charger-Problems-768x419.webp)
![Why Do Electric Golf Cart Runs Then Stops? [Explained]](https://www.golfertroop.com/wp-content/uploads/2023/08/Why-Do-Electric-Golf-Cart-Runs-Then-Stops-Explained-768x480.png)